Showing posts with label youtube. Show all posts

Sunday, November 3, 2013

HOW TO MAKE A DIAPER CAKE


HAVE YOU EVER WONDERED HOW TO MAKE A DIAPER CAKE?
I AM SO HAPPY YOU CAME BY SO I CAN SHARE HOW I MAKE MINE!


 1. 
THE BASIC THINGS THAT YOU NEED ARE DIAPERS, BOARD FROM PAPER TOWEL, TAPE, AND A RUBBER BAND.


2. 
USE RUBBER BAND TO HOLD DIAPERS AROUND  CARDBOARD TUBE.


3. 
WRAP RECEIVING BLANKET AROUND AND USE TAPE TO SECURE.


4. 
BUILD SECOND LAYER.


5. 
BUILD THIRD LAYER.


6. 
DECORATE!!!


Friday, October 4, 2013

DIY FABRIC FLOWERS

HAVE YOU EVER WONDERED HOW TO MAKE THESE ADORABLE FABRIC FLOWER ACCESSORIES YOU SEE IN THOSE OVER PRICED BOUTIQUES?  
I AM SO HAPPY THAT YOU VISITED MY PAGE SO I CAN SHARE WITH YOU HOW I MADE THEM AND WHAT I USED THEM FOR!
NO NEED TO GET INTIMIDATED.
BELIEVE ME, 
THESE ARE SO EASY TO MAKE, 
YOU WILL LOOK LIKE A SEASONED CRAFTER WHEN IT IS ALL SAID AND DONE!


NOW HERE IS HOW I MADE THEM!!!

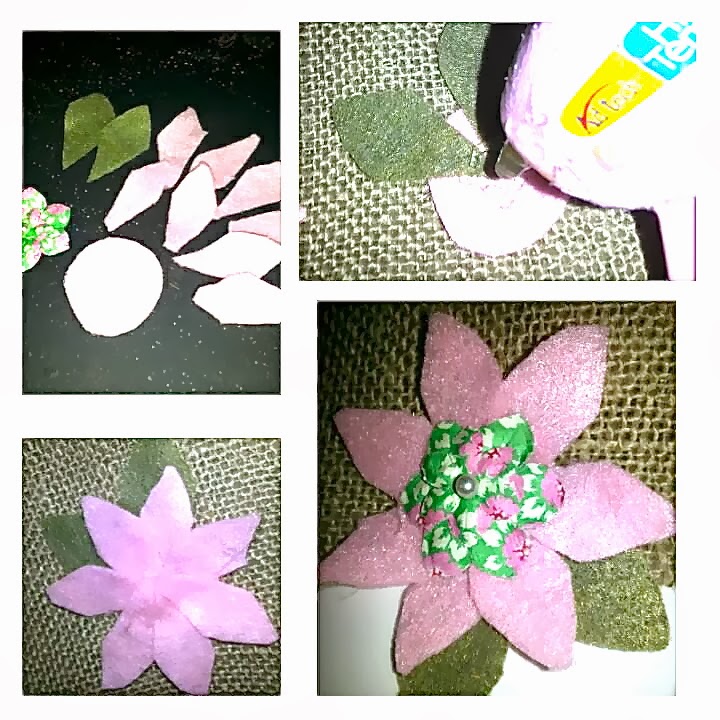
1.CUT FABRIC INTO 2 CIRCLES THE SIZE OF HOW BIG YOU WANT THE FLOWER TO BE.
2.CUT CIRCLES INTO 1/4'S.
3.CUT A SMALL CIRCLE OUT OF FELT THE SIZE OF A QUARTER.
4.FOLD EACH INTO 1/3'S LIKE SHOWN IN PICTURE.
5.STICK INTO CIRCULAR PATTERN ONTO SMALL CIRCLE PIECE.
6.FINISH OFF WITH A FLOWER ON TOP!

1.CUT A LONG SKINNY PIECE OF FABRIC ABOUT 2" WIDE
2.TIE A KNOT ON THE END
3.TWIST AND GLUE INTO A CIRCULAR PATTERN
4.FINISH OFF WITH BEADS ON TOP

1.CUT LONG PIECE OF FABRIC.
2.FOLD IN HALF LONG WISE AND GLUE TOGETHER.
3.CUT FOLDED SIDE IN A COMB LIKE PATTERN LIKE SHOWN IN THE PICTURE.
4.ROLL AND GLUE.

1.CUT FELT FABRIC INTO A FEW LEAF LIKE PATTERN.
2.CUT 1 PIECE INTO A SMALL CIRCLE THE SIZE OF A QUARTER.
3.GLUE LEAVES AND PETALS AS PREFERRED ONTO CIRCLE.
4.FINISH OFF WITH A FLOWER ON TOP.


Friday, September 27, 2013

DIY CORK MESSAGE BOARD


THIS IS THE 3RD AND FINAL PART OF MY 3 PART SERIES OF MESSAGE BOARDS!


MATERIALS:
1. FRAME FROM THE DOLLAR STORE
2. PRINTED FABRIC
3. CORK BOARD 
4. SPRAY PAINT
5. MOD PODGE
6. RIBBON/ROPE
7. GLUE GUN


HOW I MADE IT:
1. TAKE GLASS OUT AND SPRAY PAINT THE FRAME, LET DRY
2. CUT CORK THE SIZE TO FIT THE INSIDE OF FRAME
3. PAINT CORK EVENLY WITH MOD PODGE
4. CAREFULLY STICK FABRIC ON CORK AND SECURE
5. CUT EXCESS FABRIC
6. PUT CORK IN FRAME, GLUE GUN BACK TO SECURE
7.) FINISH OFF WITH A RIBBON GLUED TO THE BACK FOR HANGING!

CLICK PIC BELLOW FOR MY VIDEO TUTORIAL

Wednesday, September 25, 2013

DIY COOKIE SHEET MAGNET MESSAGE BOARD


THIS IS MY SECON PART OF MY THREE PART SERRIES OF MESSAGE BOARDS!


MATERIALS:
1. COOKIE SHEET FROM THE DOLLAR STORE
2. CRAFT PAPER
3. RIBBON/ROPE
4. MOD PODGE
5. GLUE GUN
6. WIDE PAINT BRUSH
7. SPRAY PAINT


HOW I DID IT:
1. SPRAY PAINT PAN AND LET DRY
2. CUT CRAFT PAPER THE EXACT SIZE OF THE INSIDE OF THE PAN
3. PAINT THE BACK OF YOUR CRAFT PAPER WITH MOD PODGE EAVENLY.
4. CAREFULLY STICK ON INSIDE OF COOKIE SHEET AND SECURE
5. FINISH OFF WITH A RIBBON GLUED TO THE BACK.

CLICK PIC BELOW FOR MY VIDEO TUTORIAL


Monday, September 23, 2013

DIY RIBBON BULETIN BOARD


THIS IS THE FIRST OF MY 3 PART SERIES OF MESSAGE BOARDS!

MATERIALS
1. CARD BOARD FROM THE BACK OF A FRAME
2. X2 FOAM BOARDS CUT TO THE SAME SIZE AS THE CARD BOARD
3. RIBBONS
4. PRINTED FABRIC
5. LACE
6. X2 THUMB TACKS
7. DUCT TAPE
8. ROPE
9. GLUE GUN


HOW I MADE IT:
1. DUCT TAPE ALL 3 BOARDS TOGETHER
2. WRAP BOARDS WITH FABRIC AND DUCT TAPE TO BACK
3. WRAP WITH LACE AND DUCT TAPE TO BACK AS WELL
4. GLUE 2 PIECES OF RIBBON ON TOP BACK MIDDLE AND TOP BACK CORNER
5. BRING RIBBONS AROUND THE FROND, ARRANGE IN AN ANGLE, PULL TIGHT AND GLUE TO BACK OF BOTTOM MIDDLE AND BOTTOM CORNER.
6. USE 2 MORE PIECES OF RIBBON AND DO THE SAME GOING THE OPPOSITE WAY CREATING 2 X'S
7. PLACE THUMB TACKS WHERE X'S MEET
8. FINISH WITH A RIBBON TO HANG!

CLICK PICTURE FOR MY VIDEO TUTORIAL

Friday, September 20, 2013

PREVIEW TO MY 3 PART SERRIES MESSAGE BOARDS


IS IT JUST ME OR DOES ANYONE ELSE LOOK AROUND YOUR HOME AND ALWAYS THINK OF IDEAS ON HOW YOU CAN IMPROVE EVERY NOOK AND CRANNY IN YOUR HOUSE?  DO YOU EVER LOSE SLEEP DISECTING AND SRATEGISING TECHNIQUES ON HOW TO TACKLE YOUR NEXT PROJECT? DO YOU  HAVE NEVERENDING PILES OF CRAFT AND ART MATERIALS THAT COULD LAST A NORMAL PERSON A LIFETIME? I SURE DO. I FEEL THAT I SPEND ABOUT 75% OF MY TIME TACKLING MY NEVERENDING TO DO LIST,  SPECIALLY NOW THAT WE ARE LIVING IN THIS SO CALLED "PINTREST" ERA. SOMETIMES I FEEL LIKE IT'S A CURSE, BUT, AFTER TACKLING ONE PROJECT AT A TIME,(WELL MAYBE 2 OR 3 AT A TIME), I ALWAYS GET THIS HAPPY FEELING INSIDE! IT'S A PRICELESS FEELING OF ACCOMPLISHMENT!!!  SOME PEOPLE MIGHT SEE IT AS A HOBBY BUT I THINK IT MIGHT BE AN ADDICTION.  AM I ALONE ON THIS???
THIS NEXT SERRIES OF CRAFT PROJECTS IS AN IDEA THAT CAME TO ME WHEN I WAS CHANGING OUT PICTURES IN MY DAUGHTERS ROOM. LET ME TELL YOU GUYS, AFTER FINDING THE PERFECT PICTURE FOR EACH FRAME, CROPPING, CUTTING TO SIZE, RECONFIGURING THE ARRANGEMENT ON THE WALL, AND FINALLY HANGING THEM, IT TOOK MORE TIME THAN SAID.  SO I HAD THIS CREATIVE IDEA ON USING MESSAGE BOARDS TO DISPLAY PICTURES, LITTLE STICK IT NOTES, AND DRAWINGS ALL IN ONE COLLAGE!  I FIGURED, ONE, IT WOULD BE EASIER TO CHANGE PICTURES OUT, AND TWO, I ENVISHIONED IT BEING SO DARN CUTE!  I HAD THREE IDEAS AND COULDNT DECIDE WHICH ONE TO MAKE SO I MADE ALL THREE! I COULDNT RESIST.

STAY TUNED FOR MY TUTORIAL THAT I WILL BE POSTING NEXT WEEK!!!

#1 OF THE THREE PART SERIES:
RIBBON MESSAGE BOARD.
(TUTORIAL WILL BE POSTED MON. 9/23/13)


#2 OF THE THREE PART SERIES:
COOKIE SHEET MAGNET BOARD
(TUTORIAL WILL BE POSTED ON WED. 9/25/13)


#3 OF THE THREE PART SERIES:
FRAMES CORK BOARD.
(TUTORIAL WILL BE POSTED ON FRI. 9/27/13)


YOU MIGHT ALSO LIKE THESE TO ADD TO THE COLLAGE!

Thursday, September 19, 2013

HOW TO REVAMP AN OLD NECKLACE

CLICK THE PICTURE FOR MY VIDEO TUTORIAL

Every craft project has a story. When you are triggered to create something new it must have inspired you in some kind of way!  This is how my story started.

I was doing my semiannual "DEEP" cleaning of my closet a week ago. I do this religiously to make room for "NEW THINGS"!!! I started off by bringing a large trash bag upstairs thinking that this will be big enough to de-clutter my closet. NOT. After 9 hours of de-cluttering and organizing, I filled five large trash bags full of clothes and accessories. YIKES :/ . Why does this happen every six months? I must say though that two of those bags where my daughter's things! But, then again, I guess it was me who bought those for her as well. 

Getting to my story, while I was decluttering and organizing, I stumbled upon a few of these long necklaces that where popular back in the "early" turn of the century.  In other words, ten long years ago. Doing the math, I have stumbled upon these necklaces about twenty times calculating by my "so called" semi annual "DEEP cleaning" events.  Why have I not thrown them away? I figured it was time to let them go so I placed them in the bag and loaded them up in my car to drop it off to Goodwill. When I got there a nice gentleman greeted me at the drop off door. I opened the back door to my SUV and the necklaces somehow fell out of the bag. Was this a coincidence? I took another look at them and decided to keep them for the twentieth time. I figured every time I stumbled upon them, I must have found potential in them! the gentleman kindly assisted me to unload the rest of the trash bags and handed me a donation receipt. I hurried back home and spread these necklaces out on my craft table and played around with them. I came up with this easy two step process on how to transform these long necklaces into big chunky statement piece necklaces that is current in today's fashion world. how have I not come up with this sooner?  I do not know but I'm glad to say that I am happy I kept them, made them new again, and share this wonderful story with all of you!!!  

Wednesday, September 18, 2013

DIY Monogram Sign


This week I have been contemplating on what to give my friend for her baby shower that would be more sentimental than a store bought toy. 
This week I will be sharing two home made gifts that sure was a hit at the party!!!

Today I will be showing you how I made this monogram sign for her little girl to be!

Something about home-made gifts shows that it is made from the heart and gives it more of a sentimental value!

CLICK BELOW TO VIEW VIDEO TUTORIAL

Materials:
frame
mod podge
craft paper/printed fabric
wooden letter
ribbon/rope
spray paint
craft paint
paint brush
glue gun
1.) Take the glass out of the frame. Throw away glass.
2.) Spray paint the frame with the color you prefer and let dry
3.)Spray paint wooden letter with a color you prefer and let dry. 
***You may use craft paint of mod podge craft paper on face of letter if you prefer*** 

4.) While you are waiting for the frame and wooden letter to dry, go ahead and mod podge    the back of your craft paper/printed fabric and attatch to back piece of frame.
This will serve as your background!
5.) When your frame is dried go ahead and attach back piece and secure.
6.)When your wooden letter is dried, glue gun back side of letter and attach to center of frame.
***You can also use regular Elmer's glue or super glue if you do not feel comfortable using a glue gun***
7.)Finish it off with attaching a ribbon to the back with a glue gun.
***You can also use duct tape if you are not comfortable using a glue gun***

**********************
STAY TUNED FOR MY NEXT PROJECT COMMING UP THIS WEEK!!!

DIY TUTORIAL FOR FABRIC FLOWER HAIR PIECES USED AS DECOR FOR DIAPER CAKE!

CLICK PICTURES TO LINK!


Friday, September 6, 2013

HOW TO MAKE A SNOW GLOBE

HOW TO MAKE A SNOW GLOBE


Thank you for my first request from my cousin Rhia!!!
I received a text this morning saying that she wanted me to teach her son how to make a snow globe. I promised her I was going to post this for her this evening.
This process is quite simple. First I stopped by the Goodwill this afternoon after lunch with my best friend.  I purchased a mason jar and a small figurine to use for this project. I had the rest of the materials at home.  Now I'm ready!!!

MATERIAL LIST:
1. Mason Jar
2. Glue Gun
3. Glitter 
4. Figurine

1.) Glue the bottom of your figurine to inside of mason jar lid.
2.) Fill your jar with watter and glitter.
3.) Secure lid tight 
*Bonus: You might even add a ribbon to the bottom! 


Wednesday, September 4, 2013

POP ART VIDEO TUTORIAL


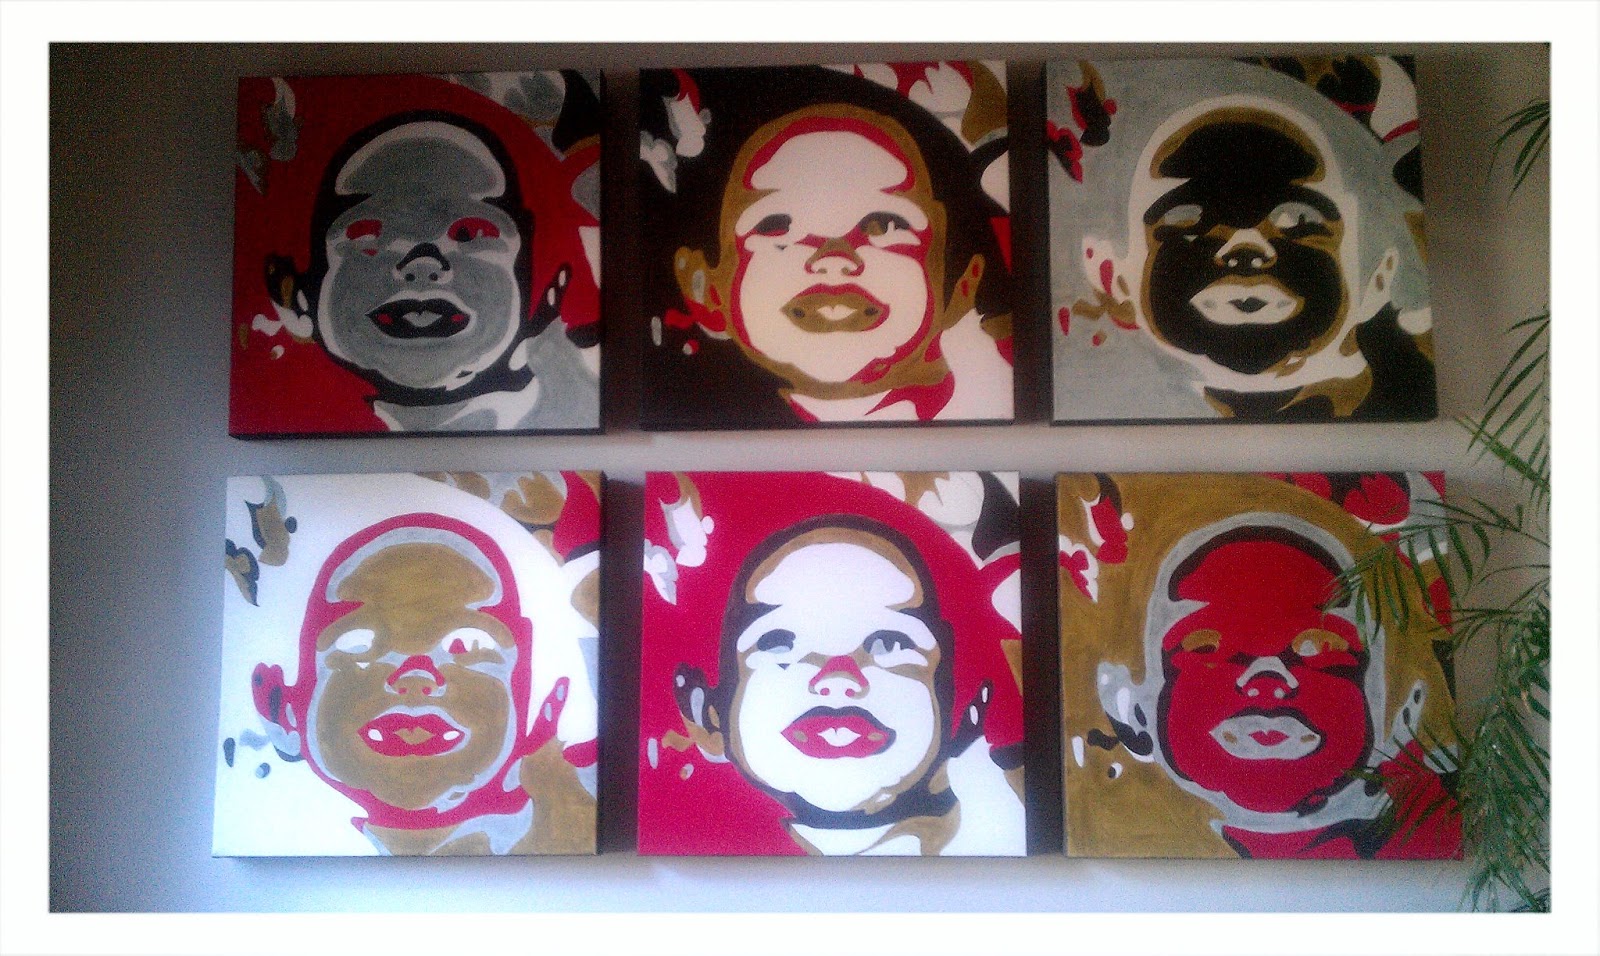
THIS IS A VIDEO OF MY STEP BY STEP TUTORIAL ON AN ANDY WARHOL POP ART RENDITION OF A PICTURE OF MY DAUGHTER!
I HOPE YOU GUYS ENJOY AND PLEASE SHARE PICTURES OF YOUR PROJECT TO BE FEATURED ON MY BLOG!!!

LINK TO POP ART PHOTO EDITOR:


LINK TO DIY PROJECTOR:


Tuesday, September 3, 2013

DIY Subway Art Project


I love it when I can replicate a piece of art and personalize it for hundreds less don't you.  In this project I chose to use my childhood address! This place gave me a lot of great memories as a child and now, every time I see this piece, it gives me a happy feeling inside! Priceless!
Some of you might get intimidated by making this piece but it wouldn't hurt to try right? This piece only cost me $10 versus $599 in Restoration Hardware! What a deal right? 
It will definitely be a conversation piece at your next family party!!!
Are you ready to get your hands dirty and get crafty???

All you need is:

-Foam board from the dollar store 
-paint
-scrap board from any hardware store and cut 2" larger around the foam board
***(the first 4 cuts are usually free)
-scrap wood trim cut to frame your art work

Easy enough???
NOW ARE YOU READY! 

CLICK BEL0W FOR MY VIDEO TUTORIAL


Reality Check Of A Starving Artist.


Hi my name is Regina. I'm happily married and a mother of a beautiful little girl! I love to be surrounded with my family, friends, and those who give out positive energy! I'm an ARTIST by heart but never had the means to pursue it.  I'm sure most artists can relate. I actually went to school for art but life sort of took another path. I was blessed with a surprise of having my first child!!! Although I was happy to start a new chapter in my life, I was hit with a life altering "Reality Check". Starving artist and a new born baby did not fit the equation of a realistic future for my growing family.  My husband and I lived in a studio apartment with no place to put a child.  We where drowning with bills and literally was starving.  Finally I had to make the harsh decision to put my "Passion for Art" on hold.  I then decided to go back to school for nursing, which was my second choice!  I love it! But, as an artist by heart, I yearn for creativity.  To fill that void, I continued to play around with art and eventually filled my home with all my original art work and gift friends with hand made trinkets!  Friends and family who've seen my work all ask me if I still commission art work for people. Plenty ask for ideas or tutorials on how I make them.  This is why I launched this blog!  "I want to inspire people to tinker with their inner artist".  Art is deceiving and most think they where not made to use that side of their brain. This is why I am showing simple step by step instructions to create your own art piece that you would be proud to showcase!!! Pretty soon your home will be filled with original art work by YOU!!!  I will be posting new projects often so please subscribe to my blog to get updates on new ideas you can try!!!