Showing posts with label kids art. Show all posts

Friday, October 4, 2013

DIY FABRIC FLOWERS

HAVE YOU EVER WONDERED HOW TO MAKE THESE ADORABLE FABRIC FLOWER ACCESSORIES YOU SEE IN THOSE OVER PRICED BOUTIQUES?  
I AM SO HAPPY THAT YOU VISITED MY PAGE SO I CAN SHARE WITH YOU HOW I MADE THEM AND WHAT I USED THEM FOR!
NO NEED TO GET INTIMIDATED.
BELIEVE ME, 
THESE ARE SO EASY TO MAKE, 
YOU WILL LOOK LIKE A SEASONED CRAFTER WHEN IT IS ALL SAID AND DONE!


NOW HERE IS HOW I MADE THEM!!!

1.CUT FABRIC INTO 2 CIRCLES THE SIZE OF HOW BIG YOU WANT THE FLOWER TO BE.
2.CUT CIRCLES INTO 1/4'S.
3.CUT A SMALL CIRCLE OUT OF FELT THE SIZE OF A QUARTER.
4.FOLD EACH INTO 1/3'S LIKE SHOWN IN PICTURE.
5.STICK INTO CIRCULAR PATTERN ONTO SMALL CIRCLE PIECE.
6.FINISH OFF WITH A FLOWER ON TOP!

1.CUT A LONG SKINNY PIECE OF FABRIC ABOUT 2" WIDE
2.TIE A KNOT ON THE END
3.TWIST AND GLUE INTO A CIRCULAR PATTERN
4.FINISH OFF WITH BEADS ON TOP

1.CUT LONG PIECE OF FABRIC.
2.FOLD IN HALF LONG WISE AND GLUE TOGETHER.
3.CUT FOLDED SIDE IN A COMB LIKE PATTERN LIKE SHOWN IN THE PICTURE.
4.ROLL AND GLUE.
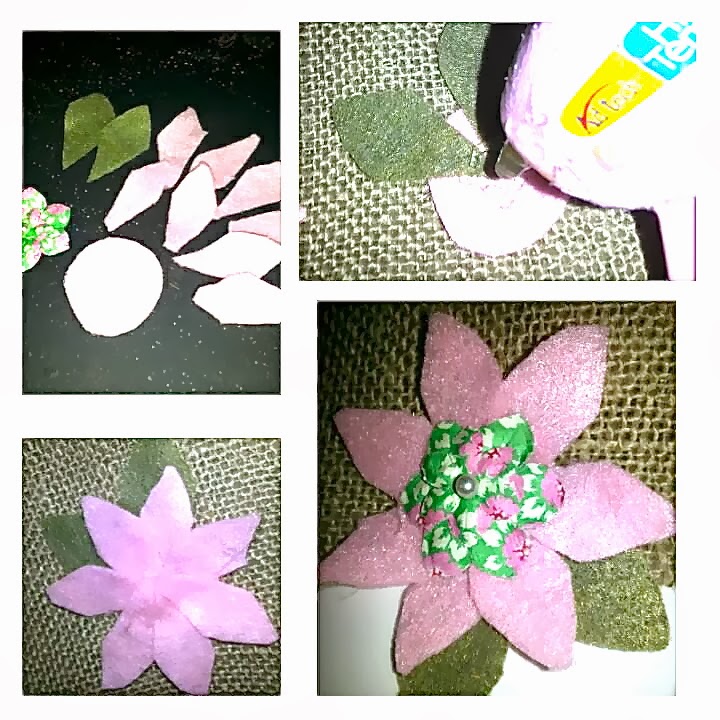
1.CUT FELT FABRIC INTO A FEW LEAF LIKE PATTERN.
2.CUT 1 PIECE INTO A SMALL CIRCLE THE SIZE OF A QUARTER.
3.GLUE LEAVES AND PETALS AS PREFERRED ONTO CIRCLE.
4.FINISH OFF WITH A FLOWER ON TOP.


Wednesday, September 18, 2013

DIY Monogram Sign


This week I have been contemplating on what to give my friend for her baby shower that would be more sentimental than a store bought toy. 
This week I will be sharing two home made gifts that sure was a hit at the party!!!

Today I will be showing you how I made this monogram sign for her little girl to be!

Something about home-made gifts shows that it is made from the heart and gives it more of a sentimental value!

CLICK BELOW TO VIEW VIDEO TUTORIAL

Materials:
frame
mod podge
craft paper/printed fabric
wooden letter
ribbon/rope
spray paint
craft paint
paint brush
glue gun
1.) Take the glass out of the frame. Throw away glass.
2.) Spray paint the frame with the color you prefer and let dry
3.)Spray paint wooden letter with a color you prefer and let dry. 
***You may use craft paint of mod podge craft paper on face of letter if you prefer*** 

4.) While you are waiting for the frame and wooden letter to dry, go ahead and mod podge    the back of your craft paper/printed fabric and attatch to back piece of frame.
This will serve as your background!
5.) When your frame is dried go ahead and attach back piece and secure.
6.)When your wooden letter is dried, glue gun back side of letter and attach to center of frame.
***You can also use regular Elmer's glue or super glue if you do not feel comfortable using a glue gun***
7.)Finish it off with attaching a ribbon to the back with a glue gun.
***You can also use duct tape if you are not comfortable using a glue gun***

**********************
STAY TUNED FOR MY NEXT PROJECT COMMING UP THIS WEEK!!!

DIY TUTORIAL FOR FABRIC FLOWER HAIR PIECES USED AS DECOR FOR DIAPER CAKE!

CLICK PICTURES TO LINK!


Wednesday, September 11, 2013

DIY Clipboard Frame


Have you ever been frustrated on what to do with all your child's art works? Have you ever got the "Mom, do you not like my drawing/painting?" or  "Why didn't you hang it up?" as they noticed all there art work piled up on the corner of your kitchen counter. Here is an easy and cheap way to showcase and display your children's art work with style at work and at home!!! This can even give your kid/kids a boost of confidence seeing that you are proud of their work and be more inspired to be creative!!!

Materials you need:
-Mod Podge
-A piece of board cut to preferred size
-Craft papers or Wrapping paper
-Ribbon
-Clothes line clips X2 
-Glue gun
-Exacto knife/ box knife.

Here is how I made it:

I.) Arrange craft/ wrapping paper on the board as preferred and Mod Podge in place, turn back   and cut excess paper with an exacto knife.

2.) Mod Podge craft paper on to the front of clips, turn back and cut excess paper with exacto knife.

3.) Arrange your clips on top of the board as preferred and glue in place.

4.) Arrange ribbon in the middle of the back of the board as preferred, preferably 6" apart, and glue.

5.) Finish off with some embellishments like crafty flowers, your child's name or a quote on top!